| 
 I'm
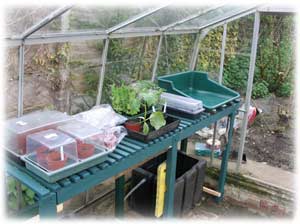
proud of myself; I've just been adjusting the staging
(the shelf/worktop for the plants) in the greenhouse to the new brick
floor we put in and after only 5 or 6 saw cuts I've got it LEVEL! This
is a big achievement on such an uneven floor, and on such an unwieldy
structure that I have to keep flipping over in a confined space. I'm
proud of myself; I've just been adjusting the staging
(the shelf/worktop for the plants) in the greenhouse to the new brick
floor we put in and after only 5 or 6 saw cuts I've got it LEVEL! This
is a big achievement on such an uneven floor, and on such an unwieldy
structure that I have to keep flipping over in a confined space.
Revamping the staging might not seem like much but it's one of these
things that's central to the garden; the hub of so many activities, like
sowing, transplanting and potting on. It finishes off the groundwork on
paths, patios and water butts that we've put in through the winter.
It was made, 15 or 20 years ago, from recycled timber that I'd rescued
from here and there; by dismantling furniture that was being thrown out,
for example. Most of the hardwood laths on the bench top are off-cuts
from a neighbour's bathroom floorboards. I've freshened it up with several
dregs of garden paint that I had left over, so that's helped clear some
space on the shelf in the garage.
Joined-up Time
 It's
good to take a complete break from all the effort of getting my book together
and, much as I've enjoyed recent social events, it's great to be able
to amble along through the day without breaking off to entertain visitors,
which effectively means that your morning or afternoon gets broken up.
I like having joined-up time. It's
good to take a complete break from all the effort of getting my book together
and, much as I've enjoyed recent social events, it's great to be able
to amble along through the day without breaking off to entertain visitors,
which effectively means that your morning or afternoon gets broken up.
I like having joined-up time.
After a day's steady work, the greenhouse is now so neat that
I could almost use it as a cramped second studio.
Strutting my Stuff
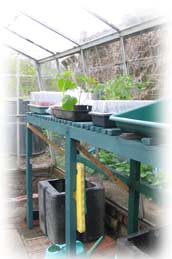
 Because
we've extended the bed at the end of the greenhouse, I've cut down the
length of the staging by one third. The structure is no longer supported
at the far end and it has also lost structural integrity because I've
omitted the lower shelf to allow space for the water tanks that we've
fitted below. Because
we've extended the bed at the end of the greenhouse, I've cut down the
length of the staging by one third. The structure is no longer supported
at the far end and it has also lost structural integrity because I've
omitted the lower shelf to allow space for the water tanks that we've
fitted below.
I realised that to make it stable I needed a couple of cross-braces (right).
These are recycled timber too; part of the packing that came when the
new oven was delivered. We were sure they'd come in for something and
they haven't been hanging around for long. 
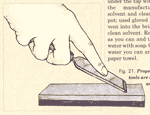
Illustration from 101 Things to do in a Shed; warning;
don't do this at home! - you'd ruin your chisel if you did this way;
you should hold the blade flat against the stone when you take the
burr off the back of the blade. |
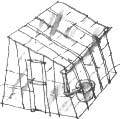
101 Things to do in a Garden Shed
Struts, lap joints and staging remind me of a book I was given
for Christmas; 101 Things to do in a Garden Shed by Rob
Beattie which celebrates the delights of working with hand
tools, improvising as you go, to recycle timber and other scrap
materials into various useful gadgets, games and experiments (I
haven't read it yet but just looking through for a sample illustration
I've spotted an inaccuracy, left). It's a beautifully designed
book which evokes the lost world of Boys Own Paper articles
on how to do this and that.
Except it isn't a lost world. If you're lucky enough to own a garden
shed you can make a start this weekend.
|
Richard Bell, [email protected]
|